Once you’ve explored Google’s search engine, another incredibly popular service within Google’s suite is Gmail, the free email service.
For many, Gmail stands out as the top choice when it comes to email. Why? Firstly, it’s completely free to use! Plus, it comes packed with some really cool stuff.
You get a powerful search function, making it super easy to find any email you need. Also, there’s great protection against spam emails, which means you won’t be bothered by those annoying messages.
One of the best things about Gmail is that it gives you plenty of space to store all your emails and files. It’s like having your very own digital treasure chest!
And you know what? Lots of folks use Gmail for everything! They use it to keep their digital life neat and organized. It’s kind of like a personal assistant for managing all your online stuff! Cool, right?
How to Create a Gmail Account
If you’re excited to start using Gmail, the first step is to create a new account on the Google website. This account gives you access to all the amazing services Google offers. Ready to get started? Follow these simple steps:
- Go to Google’s Account Creation Page: To begin, head over to (accounts.google.com) to create your new Google account.
- Fill in Your Information: Once you’re on the page, you’ll see some boxes asking for your information, like your name, desired email address, password, and a few other details. Fill these in carefully.
- Verify Your Account: After you’ve entered all the required info, Google might ask you to verify your identity. This is just to make sure it’s really you creating the account and not someone else using your info.
- Agree to Terms and Conditions: Next, you’ll probably see some terms and conditions. Take a moment to read through them (yes, it’s important!), and if you agree, click the button that says something like “I agree” or “Accept.”
- Congratulations, You’re In! Once you’ve gone through these steps, you’ve successfully created your new Gmail account! Now you can start exploring and using all the amazing features Google has to offer.
Creating a Gmail account is your ticket to a world of incredible services, so don’t hesitate to get started!
How to Send Email in Gmail: A Beginner’s Guide
Now that you’ve set up your Gmail account, it’s time to dive into the wonderful world of email communication! Here’s a walkthrough of Gmail’s key features:
Navigating Gmail:
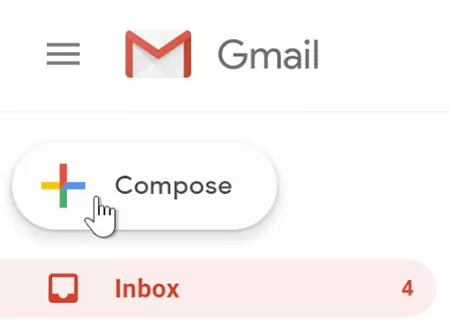
- Accessing Gmail: Head to Gmail.com and log in to your account.
- Understanding the Menu:
- Compose: Click here to write and send emails.
- Inbox: This is where all your received emails are stored.
- Starred: Mark important messages with a star for quick access.
- Snoozed: Postpone email notifications for later reminders.
- Sent: View all the emails you’ve sent.
- Draft: Store emails you’re still working on.
- Important: Gmail automatically identifies and categorizes important emails based on your interactions.
- Chats: Access Hangouts messages here.
- Scheduled: Schedule emails to be sent later.
- All Mail: See all your emails in one place.
- Spam and Trash: Find spam and deleted emails here.
- Categories:
- Social, Updates, Promotions: Gmail automatically sorts emails into these categories for easy viewing.
- Managing Labels:
- Show/Hide Labels: Control which labels are visible.
- Create New Label: Organize your emails by creating custom labels.
- Meetings:
- New Meeting: Create a video meeting directly from Gmail.
- Join a Meeting: Easily join scheduled video meetings.
Sending an Email:
- Compose: Click on “Compose” to start writing an email.
- Recipient: Enter the recipient’s email address in the “To” field.
- Subject: Write a brief subject line describing your email.
- Body: Type your message in the larger text box.
- Attachments: Add files or images by clicking the paperclip icon.
- Send or Schedule: Click “Send” to immediately send the email or choose “Scheduled send” to send it at a specific time.
Sending an email is as easy as pie! Practice navigating these sections to master Gmail’s functionalities and streamline your communication.
Remember, Gmail is a versatile tool, so feel free to explore its features to make your email experience even better!
How to Send an Email Using Gmail
To send an email :
1. In the left menu, click on the Compose button.
2. The Compose window appears in the lower right corner of the screen.
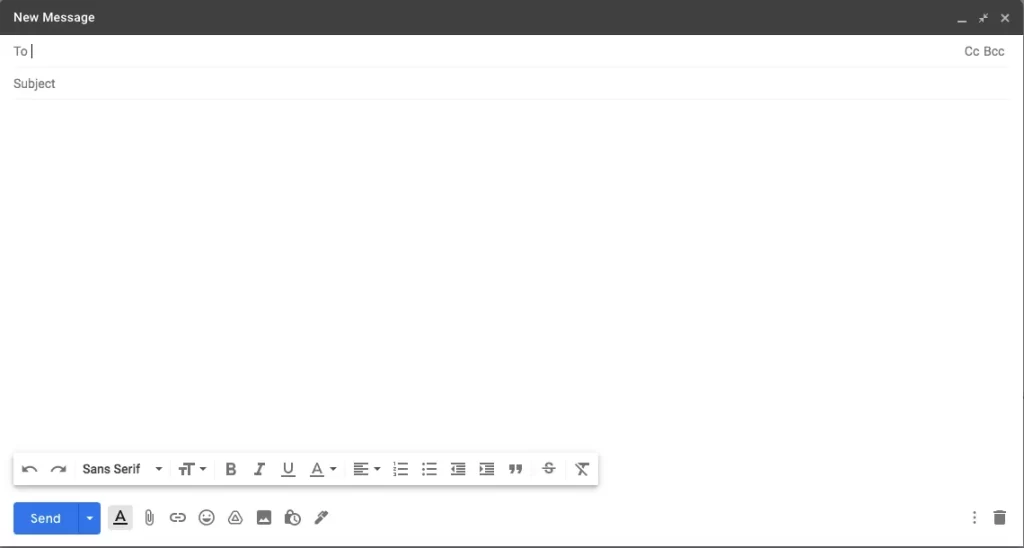
3. Type one or more emails (separated by comma) addresses in To or click on To and select one of your contact list email addresses
4. Write your subject
5. CC means Carbon Copy and has the same functionality as To.
6. BCC means Blind Carbon Copy, and the e-mail address entered into BCC is not visible to other recipients.
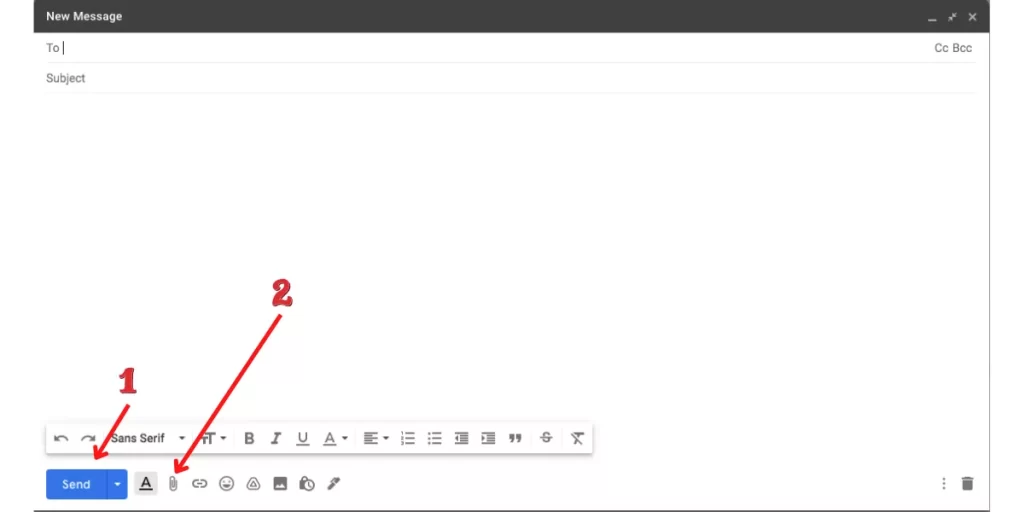
7. In the next section, compose your message and use the Send(1) button to send your message.
8. You can add a file to your email by clicking on the clip(2) icon
How to Navigate Your Gmail Inbox
Once you’ve opened an email, you’ll notice various buttons at the top of the page. Let’s break them down:
Back to Inbox
This button takes you back to the previous page.
Archive
Archiving an email removes it from your main inbox, but don’t worry, it’s not deleted! You can always find it in your “All Mail” section.
Report Spam
Although Gmail does its best to filter spam, sometimes it sneaks into your inbox. Use “Report Spam” to notify Gmail about these pesky emails.
Delete
Clicking here moves your email to the trash.
Mark as Unread
Marking messages as unread in various messaging platforms
Snooze
This handy feature allows you to set a reminder to read your email later.
Add to Tasks
Attach an email to a task for easy reference.
Move To
The “Move To” feature in Gmail allows you to relocate an email from your inbox to a specified folder or category. It helps you organize your emails better by placing them in designated folders for easy access or sorting.
Labels
Labels in Gmail are similar to folders but with added flexibility. They serve as tags that you can assign to emails, enabling you to categorize and group similar messages together. You can apply multiple labels to a single email, making it easier to find and manage messages.
Three Dots (More)
This menu, often represented by three vertically aligned dots, opens up additional options for managing your emails in Gmail. It provides a range of functions including archiving, deleting, marking as unread, adding labels, moving emails, and more.
Mark as Unread
By selecting “Mark as Unread,” you can change the status of an email you’ve already opened, making it appear as if you haven’t read it yet. This is helpful for reminding yourself to revisit or address specific emails later.
Mark as Important
Marking an email as important signals its significance, making it stand out in your inbox. Gmail’s algorithms also consider marked important emails while organizing your inbox in the “Priority” section.
Add Star
Adding a star to an email is another way to highlight its importance or mark it for later attention. Gmail allows you to choose different colored stars or other symbols to suit your preferences.
Filter Messages Like This
This feature lets you create filters based on the content of an email or sender. It’s useful for automating actions like labeling, marking as important, or moving emails that match certain criteria, saving you time in managing your inbox.
Mute
Muting an email means future emails from that sender get automatically archived, sparing your inbox clutter while keeping them accessible in the “All Mail” section.
Understanding these buttons will help you efficiently manage your Gmail inbox. Explore and utilize them to organize your emails effectively!
in top right of you browser you can access to below options:
- open in new windows
- Time and date
- Star
- Reply
- 3 dots (more)
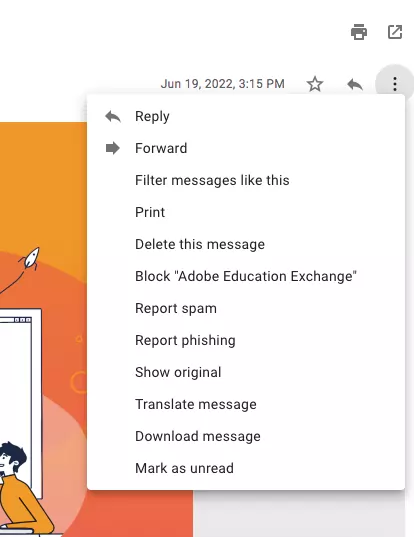
- Reply “Reply to this email”
- Forward “Forward this email to others”
- Filter messages like this “Apply special filter to the next email”
- Print “use for printing”
- Delete this message “delete email”
- Block “block this email sender”
- Report Spam “report this email as a spam”
- Report phishing “report this email as a phishing email”
- Show original
- Translate message
- Download Message
- Mark as unread
How to Check Emails on Your Mobile Device
When it comes to checking emails on your phone or tablet, you’ve got two handy options. Let’s explore both!
Option 1: Using Email Applications
Most phones and tablets are fantastic for sending and receiving emails. It’s quick and easy, almost like sending a text message. Here are some awesome email apps to consider:
Best Email Apps for Mobile:
- Alto:
- Supports AOL, Yahoo, Gmail, Outlook, iCloud, and more.
- Simple user interface and smooth design.
- Lightning-fast operation.
- Available on the Google Play Store.
- Aqua Mail:
- Compatible with AOL, Yahoo, Gmail, Apple, Hotmail, and Microsoft Exchange.
- Known for high quality and reliability.
- Among the best Android email apps.
- Blue Mail:
- Supports Yahoo, Gmail, Outlook, Office 365, and other services.
- Good speed and it’s free to install and use.
- Gmail:
- Directly connects to your Google account.
- One of the top email programs available.
- Free download on app stores.
- Inbox by Gmail:
- Exclusive for Google accounts.
- Free and speedy, though limited to Google accounts.
Option 2: Accessing Emails via Your Phone Browser
If you prefer, you can access your email using any web browser on any device. It’s as simple as opening a web page!
Checking emails on your mobile device is super convenient with these apps and browser options. Feel free to pick the one that suits you best and enjoy staying connected on the go!
The Best Email Clients for Windows and Mac
If you’ve got multiple email accounts and need an efficient way to manage them, here are five top-notch software options to consider:
1. eM Client
For: Windows and macOS
eM Client is an all-in-one email client designed with a simple and user-friendly interface. Apart from handling emails, it also excels in managing calendars, tasks, contacts, notes, and even chat. It’s highly regarded as the go-to choice for both Mac and Windows users.
2. Thunderbird
For: Windows and macOS
Thunderbird enhances your email experience by focusing on speed, privacy, and the latest tech advancements.
3. Mailbird
For: Windows and macOS
Mailbird packs power and intuitiveness in one package. It’s highly customizable, ensuring a personalized mailing experience.
4. Windows Mail
For: Windows users
Windows Mail and Calendar apps offer an easy way to stay updated with email, schedules, and communication. They’re perfect for managing both work and personal accounts, supporting various popular email services like Office 365, Exchange, Gmail, Yahoo!, and more.
5. Microsoft Outlook
For: Windows and macOS
Microsoft Outlook brings together email, calendar, contacts, tasks, and more in a unified platform. With seamless Office integration, it allows direct sharing of attachments via OneDrive, access to contacts, and viewing LinkedIn profiles.
These email clients offer diverse features catering to different preferences and needs. Whether you prioritize simplicity, advanced features, or integration with other tools, there’s an option here to suit your email management style on both Windows and Mac systems.
FAQ
How to Attach file in Gmail
- Sign in to your Gmail account
- Click on compose
- Click on the clip icon
- find your file, and click on it. wait for uploading the file
- finish
How to Send Folder in Gmail
- compress folder to zip file
- Attach zip file to an email
- finish
if size of your file is more than 25 MB you have to use google Drive
How to Send encrypted email in Gmail
Important: These steps only work if you have S/MIME enabled on your account.
- Start composing a message.
- Add recipients to the “To” field.
- To the right of your recipients, you’ll see a lock icon that shows the level of encryption that is supported by your message’s recipients. If there are multiple users with various encryption levels, the icon will show the lowest encryption status.
- To change your S/MIME settings or learn more about your recipient’s level of encryption, click the lock, then View details.
What the encryption icons mean
When you’re sending or receiving messages, you can see the level of encryption a message has. The color of the icon will change based on the level of encryption.
- Green (S/MIME enhanced encryption) . Suitable for your most sensitive information. S/MIME encrypts all outgoing messages if we have the recipient’s public key. Only the recipient with the corresponding private key can decrypt this message.
- Gray (TLS – standard encryption) . Suitable for most messages. TLS (Transport Layer Security) is used for messages exchanged with other email services who don’t support S/MIME.
Tip: TLS support is not guaranteed. Support is inferred from past communications with the email service. - Red (no encryption) . Unencrypted mail which is not secure. Past messages sent to the recipient’s domain are used to predict whether the message you’re sending won’t be reliably encrypted.
How to Send Video on Gmail
- Sign in to your Gmail account
- Click on compose
- Click on the clip icon
- find your video, and click on it. if the size of your file is more than 25 MB You have to upload it to google drive or any upload center
- finish
How to send large files in Gmail
- Use Google Drive
- Use Upload Center
- Split File to 25MB part
How To send mass email in Gmail
Google only allows you to send and receive 500 emails per day. For this reason, if you violate this limit, you will encounter an error in sending emails.
How to send a file over 25mb on Gmail
- Use Google Drive
- Use Upload Center
- Split File to 25MB part
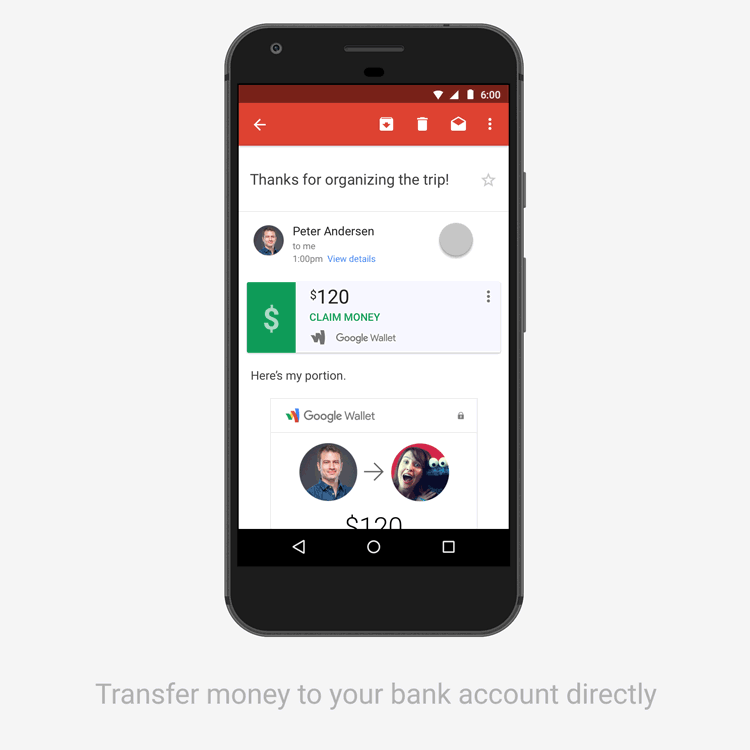
How to send money in Gmail
Tap on the attachment icon and choose whether you want to send or request money.
How to send html email template in Gmail
- Design your html page
- Open it in your browser
- Copy all page
- Paste to compose page
- Done
How to send a password protected email Gmail
You can send messages and attachments with Gmail’s confidential mode to help protect sensitive information from unauthorized access. You can use confidential mode to set an expiration date for messages or revoke access at any time. Recipients of the confidential message will have options to forward, copy, print, and download disabled.
Note: Although confidential mode helps prevent the recipients from accidentally sharing your email, it doesn’t prevent recipients from taking screenshots or photos of your messages or attachments. Recipients who have malicious programs on their computer may still be able to copy or download your messages or attachments.
- Go to Gmail
- Click Compose
- In the bottom right of the window, click Turn on confidential mode
- Set an expiration date and passcode. These settings impact both the message text and any attachments.
- If you choose “No SMS passcode,” recipients using the Gmail app will be able to open it directly. Recipients who don’t use Gmail will get emailed a passcode.
- If you choose “SMS passcode,” recipients will get a passcode by text message. Make sure you enter the recipient’s phone number, not your own.
- Click Save.
If the sender used confidential mode to send the email:
- You can view the message and attachments until the expiration date or until the sender removes access.
- Options to copy, paste, download, print, and forward the message text and attachments will be disabled.
- You might need to enter a passcode to open the email.
Last modified: December 29, 2023

