Linking objects like text, images, and icons to external websites or documents is an easy way to make your Visme presentations and infographics more interactive.
This guide explains how to add hyperlinks to your Visme projects in simple steps.
Why Add Hyperlinks?
Inserting hyperlinks in your Visme presentations and infographics makes them more useful and engaging for your audience. Key benefits include:
Navigation
- Guide viewers to additional information and resources.
- Enable non-linear content navigation.
- Create intuitive user journeys.
Interactivity
- Make projects more dynamic.
- Increase engagement through clickable elements.
- Promote calls-to-action.
Connectivity
- Link across multiple Visme projects.
- Integrate with your website and social channels.
- Cross-promote other digital content.
Credibility
- Cite sources by linking references.
- Provide access to originating documents.
- Prove facts and statements.
Usability
- Simplify access to related material.
- Reduce clutter by linking supporting data.
- Improve discoverability of connections.
How Links Work
When viewers click a linked element in Present mode, Visme:
- Detects the hyperlink assigned to that Link
- Identifies whether to open in current or new browser tab
- Launches the target destination based on link type
- Website = Loads web page URL
- Email = Opens email client
- Social = Navigates to social media profile
- Visme Project = Displays other project
Inserting Links in Visme
Follow these steps to insert a link from any element in your Visme project:
- Select the object, shape, text box or other element you want to link. This will become the clickable anchor link.
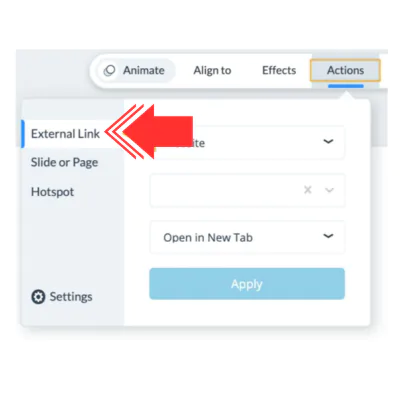
- Click the Actions menu in the top toolbar.
- Choose the External Link tab.
- Pick the link type:
- Visme Project – Choose a slid of your project, from your account
- Website – Enter any valid URL
- Email Address – Open email client to address
- Social Media – Link to social media profile
Enter the required details:
- URL for websites
- Email address
- Social media profile handle
- Select whether to open in same tab or new tab.
- Click Apply to insert the link.
- Test the link works as expected in Present mode.
Link Types Table
| Link Type | Use Case | Details Needed |
|---|---|---|
| Visme Project | Connect projects together | Choose project from dropdown list |
| Website | Send viewers to external sites | Type any valid URL |
| Open email client | Enter email address | |
| Social Media | Share to social profiles | Select network + profile name |
Tips for Linking
- Open website links in new tabs if viewers will go back-and-forth.
- Remove links anytime using the Remove Link option.
- Links work in downloaded PDF and HTML files but not static image exports like JPG or PNG.
Interactive Presentations
Adding links only takes a few clicks but dramatically increases the interactivity of your visual content. Now you can easily:
- Share related resources by linking text and images.
- Connect ideas across multiple presentations.
- Promote your website, social channels and email for more engagement.
Links make any Visme project more useful and memorable for your audience.

Visme Linking FAQs
Here are answers to common questions around linking from Visme projects:
Do I need coding skills to add links?
No, the process is simple with Visme’s intuitive drag-and-drop editor.
What objects can be linked?
Text boxes, shapes, icons, buttons, images – anything!
Is there a limit to the number of links?
No limits! Add as many links as you need to enhance your project.
How do I edit or remove links later?
Re-select the linked object and choose Remove Link in the Actions tab.
Wrap Up
With Visme’s user-friendly editor, building interactive, linked presentations is fast and simple. Now, easily guide your viewers to important resources and connect your ideas digitally.
Last modified: April 24, 2025

