Canva is a popular online design tool that allows you to create stunning graphics for various purposes. Whether you want to make a logo, a flyer, a poster, or a social media post, Canva has you covered with its easy-to-use interface and thousands of templates.
One of the features that Canva offers is the ability to turn any photo into a line drawing. A line drawing is a type of art that uses only lines to create shapes and forms. Line drawings can give your photos a sketch-like effect, making them more artistic and creative.
In this article, you will learn how to change picture to line drawing in Canva in a few simple steps. You will also learn some tips and tricks to enhance your line drawings and make them more appealing. By the end of this article, you will be able to create your own line drawings using Canva and impress your audience with your skills.
Why Use Line Drawings in Canva?
Line drawings can be used for various reasons in Canva. Some of the benefits of using line drawings are:
- They can make your photos more interesting and unique. Line drawings can add a touch of personality and style to your photos, making them stand out from the crowd.
- They can highlight the important details of your photos. Line drawings can emphasize the shapes and contours of your photos, making them more clear and visible.
- They can create a contrast between your photos and other elements. Line drawings can create a striking contrast between your photos and the background, text, or other graphics that you use in your design. This can make your design more eye-catching and attractive.
- They can suit different themes and moods. Line drawings can match different themes and moods of your design, depending on the type and color of the lines that you use. For example, you can use black and white lines for a minimalist and elegant look, or use colorful and curved lines for a fun and playful look.
How to Change Picture to Line Drawing in Canva
Changing picture to line drawing in Canva is very easy and fast. You don’t need any special skills or software to do it. All you need is a photo that you want to turn into a line drawing and a Canva account.
Here are the steps to follow:
Step 1: Upload Your Photo to Canva
The first step is to upload the photo that you want to turn into a line drawing to Canva. You can do this by clicking the “Uploads” tab in the left-hand sidebar and then selecting the “Upload an image” option. You can also drag and drop your photo from your computer to the Canva editor.
Once you have uploaded your photo, you can resize it, crop it, rotate it, or flip it as you wish. You can also apply some basic filters or adjustments to your photo if you want to enhance it.
Step 2: Apply the Trippy Effect to Your Photo
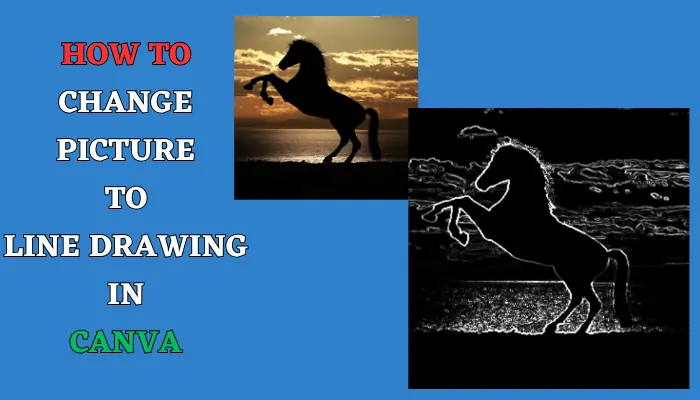
The next step is to apply the Trippy effect to your photo. The Trippy effect is one of the effects that Canva offers that can turn your photo into a line drawing. You can find the Trippy effect by clicking the “Effects” tab in the left-hand sidebar. This will open up a menu of different effects that you can apply to your image.
To apply the Trippy effect, simply click on ‘Stencil’ and wait for a few seconds. You will see that your photo has been transformed into a line drawing with black and white lines. You can adjust the intensity of the effect by dragging the slider below the effect name. You can also undo the effect by clicking the “Reset” button.
To add some text, shapes, icons, or stickers to your line drawing, select the elements tab. You can browse through thousands of elements that Canva offers, or search for specific ones using the search bar.
You can drag and drop the elements to your line drawing, and resize, rotate, or flip them as you wish. You can also change the color, font, alignment, or spacing of the text using the text settings.
Conclusion
Changing picture to line drawing in Canva is a fun and easy way to create stunning graphics for your projects. You can use line drawings to make your photos more interesting and unique, to highlight the important details of your photos, to create a contrast between your photos and other elements, and to suit different themes and moods.
To change picture to line drawing in Canva, you just need to follow these three simple steps:
- Upload your photo to Canva
- Apply the Trippy effect to your photo
- Customize your line drawing
You can also experiment with different effects, colors, styles, and elements to create your own line drawings using Canva. You can use your line drawings for various purposes, such as social media posts, flyers, posters, logos, or invitations. You can also download, share, or print your line drawings using Canva’s features.
FAQs
How do I change the background color of my line drawing in Canva?
To change the background color of your line drawing in Canva, you can use the background tab. You can choose from different colors, gradients, or patterns for your background. You can also upload your own image or use one of Canva’s photos as your background.
How do I remove the Trippy effect from my photo in Canva?
To remove the Trippy effect from your photo in Canva, you can click the “Reset” button below the effect name. This will restore your photo to its original state. You can also use the undo or redo buttons in the top bar to undo or redo your actions.
How do I save my line drawing in Canva?
To save your line drawing in Canva, you can click the “Download” button in the top right corner. You can choose from different file formats, such as PNG, JPG, PDF, or GIF. You can also adjust the quality, size, and compression of your file.
How do I share my line drawing in Canva?
To share your line drawing in Canva, you can click the “Share” button in the top right corner. You can choose to share your line drawing via email, link, or social media. You can also collaborate with others on your line drawing by inviting them to edit or view your design.
Last modified: May 15, 2024

