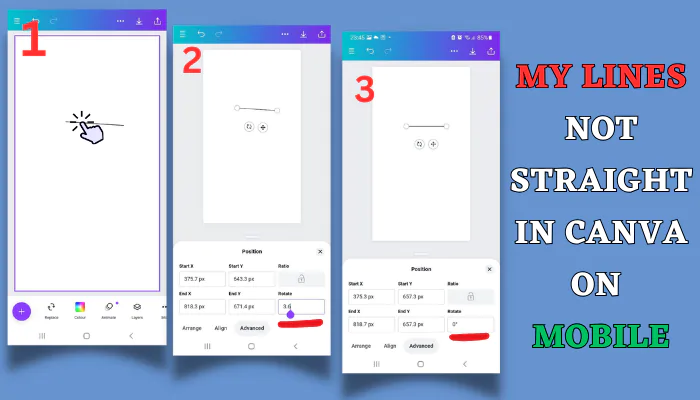
Best tips for getting straight lines in Canva mobile App
- Select your Line
- Tap on “Position” in mobile toolbar.
- Go to advanced.
- Change “Rotate” number to zero (0).
- Now you’ll have a perfectly straight line.
If you’ve ever tried to draw a line in Canva on your mobile device, you’ve probably encountered this frustrating problem: your lines just won’t stay straight.
No matter how carefully you try to position them, they end up slightly tilted, crooked, or at an awkward angle.
You’re not alone—this is one of the most common complaints from Canva mobile users.
The good news? There’s a simple, foolproof method to fix this issue in just five steps.
In this complete guide, you’ll learn exactly why your lines aren’t straight in Canva mobile, how to fix them instantly using the Position tool, and expert workarounds to prevent this problem from happening again.
Whether you’re creating social media graphics, presentations, or any design project, you’ll be able to achieve perfectly straight lines every single time.
How to Fix Crooked Lines in Canva Mobile (The 5-Step Method)
This is the most reliable method for straightening lines in Canva’s mobile app.
It uses the Position tool’s advanced rotation settings to reset your line to exactly zero degrees, guaranteeing a perfectly horizontal line.
Step 1: Select Your Line Element
Tap once on the line you want to straighten. You’ll know it’s selected when you see the selection handles (small circles) appear at both ends of the line and the toolbar appears at the bottom of your screen.
Pro Tip: If you’re having trouble selecting a line because it’s behind other elements, tap and hold on the general area until a selection menu appears, then choose your line from the list.
Step 2: Tap on “Position” in the Mobile Toolbar
Once your line is selected, look at the bottom toolbar on your screen. Tap the “Position” button—it typically appears alongside other options like Color, Transparency, and Duplicate. The Position panel will slide up from the bottom of your screen.
Step 3: Navigate to Advanced Settings
Inside the Position panel, you’ll see several options. Look for and tap on “Advanced” (or “More” on some versions). This expands additional positioning controls that aren’t visible in the basic view.
Step 4: Change the “Rotate” Value to Zero
In the Advanced settings, you’ll see a field labeled “Rotate” with a numerical value (this is the current rotation angle of your line in degrees). Tap on this number field and manually enter 0 (zero). This resets your line to exactly horizontal with no tilt whatsoever.
Note: If you want a perfectly vertical line instead, enter 90 in the Rotate field. For other specific angles, you can enter any value between 0 and 360 degrees.
Step 5: Tap Outside to Apply and Confirm
Once you’ve entered 0 in the Rotate field, tap anywhere outside the Position panel or tap the checkmark/done button. Your line will instantly snap to perfectly straight, horizontal alignment. You’ll immediately see the difference—no more awkward angles or slight tilts.
Why Your Lines Aren’t Straight in Canva Mobile
Understanding the root causes of this problem will help you prevent it in the future and work more efficiently on mobile devices.
Small Screen Precision Challenges
Mobile screens are significantly smaller than desktop monitors, which makes precise positioning inherently difficult. Your fingertip covers approximately 10-15 pixels on screen, while a mouse cursor is just 1-2 pixels. This means when you drag a line into position, even the smallest movement of your finger can rotate the line by several degrees without you noticing. The smaller your phone screen, the worse this problem becomes.
Touch Gestures Lack Pixel-Perfect Accuracy
Touch-based controls are wonderful for many tasks, but they’re not designed for precision work. When you drag, resize, or rotate objects using gestures, there’s always a margin of error. A slight wobble in your finger, an unintentional twist as you lift your finger, or even the natural tremor in your hand can cause a line to end up at 2-3 degrees off-center rather than perfectly straight.
Limited Alignment Tools on Mobile
The desktop version of Canva includes powerful alignment guides—purple snap lines that appear automatically when you drag objects near the center or edges of your canvas, or near other elements. These guides help you achieve perfect horizontal and vertical alignment effortlessly. Unfortunately, the mobile app has a much more limited version of this functionality. The snapping behavior is less aggressive, and the visual guides are less prominent, making it easier for lines to settle at imperfect angles.
No Desktop-Style Smart Snapping
On Canva’s desktop platform, objects automatically snap to a grid and to other elements when you drag them close enough. This intelligent snapping forces lines to be perfectly horizontal or vertical when they’re within a few degrees of those angles. The mobile version has significantly reduced snapping functionality, which means your lines won’t automatically correct themselves to perfect alignment as you position them.
Accidental Rotation During Positioning
When you select and drag a line on mobile, it’s very easy to accidentally activate the rotation gesture. If your finger moves in even a slight circular motion while dragging, or if you accidentally use two fingers briefly, Canva interprets this as an intentional rotation command. Before you know it, your perfectly straight line is now tilted at an odd angle.
Alternative Methods for Straight Lines on Mobile
While the 5-step Position method is the most reliable, here are additional techniques you can use depending on your specific situation.
Method 2: Use the Grid Snap Feature
Canva mobile does have a grid system that can help align your lines, though it’s not as robust as the desktop version.
Step 1: Enable Grid View
Open your design settings by tapping the three dots menu (usually in the top right corner). Look for “View Settings” or “Show Rulers and Guides.” Enable the grid view option if available in your version of the app.
Step 2: Align Line to Grid Points
With the grid visible, drag your line so that both endpoints snap to grid intersections. This forces the line to follow the grid’s horizontal or vertical orientation, resulting in a straight line.
Step 3: Fine-Tune Position
Once snapped to the grid, you can use the arrow keys or Position panel to make small adjustments without losing the straight alignment.
Note: Grid snap functionality varies between different versions of Canva mobile and may not be available on all devices.
Method 3: Align Lines Using Existing Straight Objects
Sometimes the easiest way to create a straight line is to align it with something that’s already straight in your design.
Step 1: Position Near a Straight Reference
If you have text boxes, images with straight edges, or other lines already in your design, drag your new line close to one of these elements.
Step 2: Watch for Purple Alignment Guides
As you drag your line near other objects, look for thin purple lines that appear. These are alignment guides showing you when your line is perfectly aligned with another element’s edge or center.
Step 3: Snap to the Guide
When the purple guide appears and your line is parallel to the reference object, release your finger. Your line should now be perfectly straight, matching the alignment of the existing element.
Method 4: Maximum Zoom Technique
When precision matters, zooming in can dramatically improve your control over line positioning.
Step 1: Zoom to Maximum
Use the pinch gesture (two fingers moving apart) to zoom in as far as Canva will allow on your line. The more zoomed in you are, the more screen space represents tiny movements, giving you finer control.
Step 2: Make Micro-Adjustments
At maximum zoom, drag the line endpoints to adjust the angle. Small finger movements now translate to very small position changes, allowing you to get much closer to perfectly straight.
Step 3: Verify at Normal Zoom
Zoom back out to normal view to check if your line appears straight in the context of your full design. Repeat if necessary.
Pro Tip: This method works best when combined with the Position tool method. Use maximum zoom to get close to straight, then use Position > Advanced > Rotate = 0 to achieve perfection.
Advanced Tips for Perfect Lines Every Time
Use Duplicate for Consistent Line Angles
Once you’ve created one perfectly straight line using the rotation method, tap the line and select “Duplicate” from the toolbar. This creates an exact copy with the same angle. You can then move this duplicate line to other parts of your design, ensuring all your lines maintain perfect alignment without having to adjust the rotation each time.
Create a Template with Pre-Aligned Lines
If you frequently need straight horizontal or vertical lines in your designs, create a template page with several pre-straightened lines already positioned. Copy this template whenever you start a new project, and you’ll always have perfectly straight lines ready to use.
Lock Lines After Straightening
After you’ve achieved the perfect straight line, tap it and select “Lock” from the menu (usually found in the three dots menu). This prevents accidental movement or rotation. You can still move it if needed, but you’ll have to unlock it first, preventing unintentional adjustments that could make it crooked again.
Keyboard Shortcuts Alternative
If you’re using Canva mobile on a tablet with a connected keyboard, you may have access to keyboard shortcuts similar to the desktop version. Arrow keys can move objects in small increments without rotation, helping maintain straightness.
Common Mistakes That Make Lines Crooked
Dragging from the Middle of the Line
When you grab a line from its center point to move it, you’re much more likely to accidentally rotate it. Instead, try to drag from one of the endpoints or use the Position tool to move it numerically.
Using Two Fingers Accidentally
If you touch the screen with two fingers while positioning a line, Canva interprets this as a rotation or zoom gesture. Be mindful to use only one finger when dragging lines into position.
Not Checking the Rotation Value
Even if a line looks straight to your eye, it might be at 1-3 degrees off angle. Always verify the rotation value in the Position panel if precision matters for your design.
Ignoring the Purple Alignment Guides
Those purple lines that flash briefly on your screen are incredibly helpful. Train yourself to watch for them and pause your finger movement when they appear—they’re showing you perfect alignment opportunities.
When to Use Desktop Canva Instead
While mobile Canva is incredibly powerful, some scenarios call for the precision of the desktop version.
Designs with Multiple Precise Lines
If you’re creating diagrams, flowcharts, wireframes, or any design with numerous lines that must be perfectly aligned, the desktop version’s superior alignment tools will save you significant time and frustration.
Professional Client Work
When you’re creating deliverables for clients who expect pixel-perfect precision, the desktop platform gives you more control and confidence in the final result.
Complex Technical Illustrations
Any design that requires exact measurements, specific angles, or technical precision is better suited to desktop Canva where you have access to rulers, more detailed positioning controls, and better zoom capabilities.
When You Have Time Constraints
If you need to create something quickly and it requires straight lines, desktop Canva’s automatic snapping and alignment features will get you to the finish line much faster than mobile.
That said, for quick social media posts, simple designs, and on-the-go creativity, mobile Canva with the rotation adjustment method works perfectly well.
Other Tutorials You May Like
Now that you’ve mastered creating straight lines on mobile, you might find these related guides helpful for expanding your Canva line skills:
Looking to create perfectly straight lines from scratch? Check out our comprehensive guide on how to draw a straight line in Canva

How To Draw A Straight Line In Canva
To draw a straight line in Canva: 1. Create a new design. 2. Navigate to the "Elements" tab. 3. Search for "line" and select from options. 4.
Need to add directional elements to your designs? Learn how to draw an arrow line in Canva
How To Draw An Arrow Line In Canva
in this article With the step-by-step guide you'll be learn How to Draw an arrow line in Canva and with this method you can enhance your...
Want to adjust the length or thickness of your lines? Our tutorial on how to resize a line in Canva

How To Resize a Line in Canva
If you're using Canva for design projects, it's crucial to know how to resize a line. Doing so can help you create clean and polished designs
Creating designs that need perfect horizontal dividers? Discover how to draw a horizontal line in Canva
How To Draw Horizontal line In Canva
Learn how to draw a horizontal line in Canva with this detailed step-by-step guide. Master the art of creating clean and professional designs
FAQ: Lines Not Straight in Canva on Mobile
Why do my lines keep tilting when I try to draw them straight on Canva mobile?
Lines tilt on Canva mobile because touch gestures lack the precision of a mouse, and the mobile app has limited automatic snapping compared to the desktop version. Even slight finger movements can rotate a line by several degrees. The most reliable fix is to use the Position tool’s Advanced settings and manually set the Rotate value to 0 degrees for horizontal lines or 90 degrees for vertical lines.
Is there a way to lock a line so it stays straight after I’ve fixed it?
Yes, absolutely. After straightening your line using the rotation method, select the line and tap the three dots menu, then choose “Lock” from the options. This prevents the line from being accidentally moved or rotated. If you need to adjust it later, simply select it again and choose “Unlock” from the same menu.
Can I create vertical straight lines using the same method?
Yes, the same Position tool method works perfectly for vertical lines. Follow the same steps (select line, tap Position, go to Advanced, adjust Rotate value), but instead of entering 0 degrees, enter 90 degrees. This will create a perfectly vertical line. You can also enter any specific angle between 0 and 360 degrees if you need lines at precise diagonal angles.
Why don’t the purple alignment guides appear consistently on mobile?
The purple alignment guides on Canva mobile are less sensitive than on desktop and only appear when elements are very close to perfect alignment with each other or with the canvas center. They also may not appear if you’re moving objects too quickly. Try dragging your line slowly near other elements or toward the center of the canvas to trigger the alignment guides more reliably.
Does this straightening method work on both iPhone and Android Canva apps?
Yes, the Position tool with Advanced rotation settings is available in both the iOS (iPhone/iPad) and Android versions of the Canva mobile app. The interface may look slightly different between the two platforms, but the functionality and steps are identical. Both versions allow you to manually enter a rotation value of 0 degrees to achieve perfectly straight lines.
Will straightening lines on mobile affect the design when I open it on desktop?
No, straightening lines using the rotation method is permanent and device-independent. Once you’ve set a line’s rotation to 0 degrees on mobile and saved your design, that line will remain perfectly straight when you open the same design on desktop, tablet, or any other device. The rotation value is part of the design file itself, not device-specific.
What if the Position tool doesn’t have an Advanced option on my version of Canva mobile?
If you don’t see an “Advanced” option in your Position panel, your Canva mobile app may need updating. Go to your device’s app store and check for Canva updates. If your app is current and you still don’t see this option, you may be using a line element that doesn’t support rotation adjustments. Try creating a new line using the Lines & Shapes tool instead, as these definitely support the Position and rotation features.
Conclusion
Dealing with crooked lines in Canva mobile can be frustrating, but now you have the definitive solution. The five-step Position tool method—selecting your line, opening Position settings, accessing Advanced options, setting Rotate to 0, and applying the change—will give you perfectly straight lines every single time, regardless of how tilted they started.
Remember that the challenges of mobile design—small screens, touch gestures, and limited snapping—are real obstacles, but they’re not insurmountable. By understanding why lines become crooked and using the techniques in this guide, you can create professional, polished designs entirely on your mobile device.
Whether you’re creating social media graphics on the go, quickly mocking up ideas, or doing serious design work from your phone, straight lines are now within your complete control. Use the Position method as your primary tool, supplement it with grid snapping and alignment guides when available, and don’t hesitate to switch to desktop Canva when a project demands absolute precision across many elements.
The key to mobile design success is working with the platform’s strengths while having reliable workarounds for its limitations. With the straightening methods you’ve learned today, crooked lines will never slow down your creative process again.
Last modified: October 8, 2025

