To warp an image in Canva
Just, click on it. Then click the Effects. The Liquify effect lets you distort the image. You can make the image look wavy. Or you can bend it in waves. You can make it look swirly. Or you can twist it. You pick how much to warp the image. You can warp it a little or a lot. It’s fun to warp images in Canva. You can get creative with the warp tool.
Warping an Image in Canva?
As a graphic designer, I’m always on the lookout for creative tools to enhance my designs. Canva, with its extensive range of features and options, has been my go-to platform.
In this blog post, I’ll dive into the world of image warping in Canva and how it can transform your creations. So, let’s warp into this exciting journey!
What is Image Warping?
Image warping is a technique that allows you to manipulate the shape of an image, giving it a unique twist and adding creativity to your designs. Canva, known for its user-friendly interface, offers the “Warp” tool that simplifies this process.
Varieties of Warping in Canva
When it comes to image warping, Canva offers an array of options to experiment with. Each type of warping can give your design a distinct look. Here are some of the warping styles available:
- Arc: Create a gentle curved effect.
- Bulge: Make your image appear to bulge outwards.
- Pinch: Squeeze your image, creating a pinched appearance.
- Twist: Add a twist or spiral effect to your design.
- Wave: Infuse a dynamic and wavy feel into your image.
These various warping options provide endless possibilities to add personality and creativity to your designs.
Avoiding Distortion
While warping can be a fun and creative process, it’s essential to keep an eye on potential image distortion. To minimize distortion and maintain image quality, consider the following tips:
- Start with high-quality images.
- Apply warping subtly, especially when working with detailed images.
- Make use of the “Undo” button if you’re not satisfied with the result.
Getting Started with Canva
Before diving into image warping, you need to acquaint yourself with Canva. Here’s a brief guide to get you started:
Creating an Account:
Begin by creating a Canva account, which is a straightforward process. Just visit the Canva website and sign up using your email or social media account.
Navigating the Interface:
Canva’s user-friendly interface is designed to make your experience seamless. You can access an array of design templates, organized by category, and create custom designs with ease.
Importing Images into Canva
Once you’re comfortable with Canva’s interface, the next step is importing images. Canva offers two methods for adding images to your design:
Uploading Images:
To upload your own images, go to the “Uploads” tab and click the “Upload an image or video” button. Select your desired file from your computer. Canva supports various file formats, including JPG, PNG, and GIF.
Using Canva’s Library:
Canva’s vast library contains millions of images, illustrations, and graphics to incorporate into your designs. You can access it through the “Photos” or “Elements” tab. Filters are available to help you narrow down your search.
Remember, while many images in Canva’s library are free, some may require a Canva Pro or specialized account.
Applying the Warp Effect
Now, let’s get to the exciting part: applying the warp effect. It’s a two-step process:
Selecting the Image:
Click on the image you want to edit, and the toolbar will appear. Access the warp tool by clicking on the “Effects” tab.
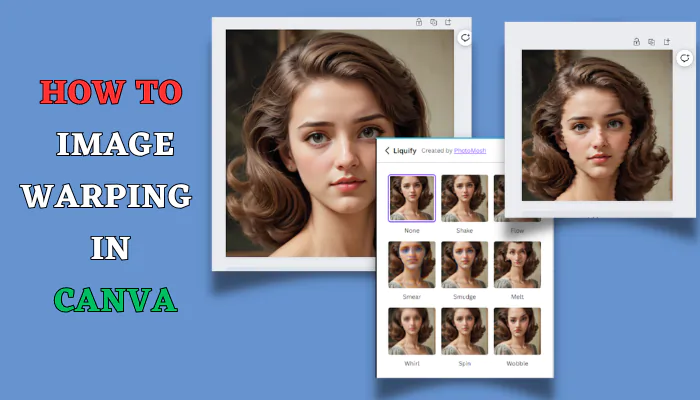
Using the Liquify:
The “Liquify” allows you to distort the image in various ways. Remember that not all images are equally suitable for warping, so experiment with settings.
Adjusting the Liquify Effect
Fine-tuning the Liquify effect is crucial to achieving your desired outcome. The “Liquify” tool provides the means to make these adjustments:
Modifying the Distortion:
Use the slider in the “Liquify” tool to adjust the level of distortion. Moving it left decreases distortion, while moving it right increases it. The extent of distortion depends on the image’s original size and quality.
Precision Adjustments:
To make more specific alterations, click and drag control points around the image.
Previewing and Saving Your Warped Image
Before finalizing your design, take a moment to preview the effect:
- Click the “Preview” button in the “Liquify” tool to see a before-and-after comparison. If you’re satisfied with the changes, hit “Apply” to save them.
Saving and Exporting
With your image perfected, it’s time to save and export it:
- Go to the “File” menu and choose “Save” to keep your project in your Canva account.
- To download a copy to your computer, use the “Download” button in the top-right corner. Canva offers various formats, including PNG, JPG, PDF, and SVG.
With these steps, you’ll have transformed a regular image into a visually captivating masterpiece. It’s a testament to Canva’s versatility and your creative prowess. So, go ahead and warp your way to design excellence!
conclusion
image warping in Canva is a creative endeavor that offers endless possibilities for personalizing your designs. Whether you’re a graphic designer or someone new to the world of design, Canva’s warp tool is your ticket to infusing your projects with personality and uniqueness. Embrace the potential of image warping in Canva and elevate your creative pursuits.
FAQs
Can I apply multiple warp effects to the same image in Canva?
Yes, you can experiment with combining different warp effects to create a truly unique look for your image. Simply follow the steps for each warp effect you wish to apply.
Can I undo a warp effect in Canva if I’m not satisfied with the result?
Absolutely. Canva provides an easy-to-use “Undo” button, allowing you to revert any changes and fine-tune your image until you achieve the desired outcome.
Is it possible to warp text in Canva, or is it limited to images?
As of the latest update, Canva primarily focuses on image manipulation. While text options are available, the warp effects are specifically designed for images.
Last modified: January 22, 2024

