Clipdrop is a free online photo editing tool that provides various features like background removal, image upscaling, cleanup, and relighting. The relight feature allows you to enhance the lighting of photos easily. In this post, we will explore how to use Clipdrop’s relight capability to improve the ambiance of images.
what is Clipdrop AI?
Clipdrop AI Makes Photo Editing Easy
Do you wish you could make your photos look more professional? With Clipdrop AI, editing photos is super simple.
All you need to do is go to the Clipdrop AI website and upload a photo. Clipdrop will automatically analyze your picture with its smart artificial intelligence technology. It studies the lighting, objects, and colors that are already there.
After Clipdrop AI scans your photo, you can use simple tools to adjust things like brightness, shadows, and warmth. If you’re not sure how you want it to look, there are preset filters like “Warm Sunset” and “Cool Moonlight.” Just click on the one you like and Clipdrop does the rest!
The best part is it still keeps your photos looking natural. The edits don’t go overboard so people can tell the picture was touched up. Clipdrop AI just gives your photos that extra boost they need to stand out.
Whether you want to spice up vacation photos, get more likes on Instagram, or make listings pop for your online shop, Clipdrop AI makes it easy. With a few clicks, your pictures go from plain old photos to visually stunning images.
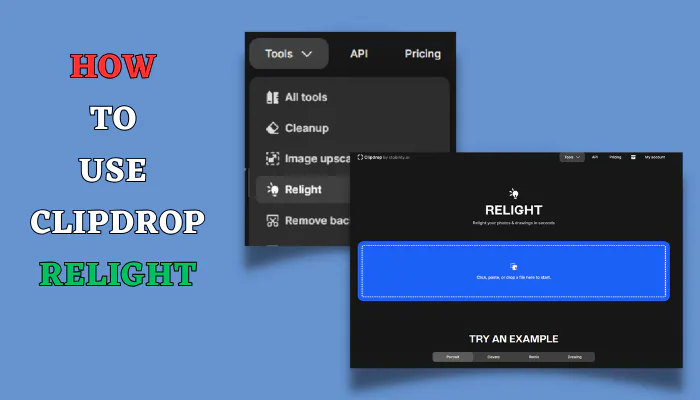
Clipdrop AI tool to Relight photos & drawings in seconds
The relight functionality in Clipdrop utilizes AI to analyze a photo and identify areas that are underexposed or overexposed. You can then add virtual lighting to selectively illuminate the image and bring out more details.
Here are some key things to know about Clipdrop’s relight tool:
- It’s completely free to use for basic functions
- Allows adding multiple colored lights and modifying their position/intensity
- Has preset options like “Receive Light” and “Antique“
- Downloads the edited photo in high resolution
Using these relighting effects carefully can significantly enhance dull-looking images. Now let’s look at how to access this feature and apply lighting adjustments.
Step-by-Step Guide to Using Clipdrop’s Relight
Follow these simple steps to relight your photos with Clipdrop:
1. Go to Clipdrop.co and Upload the Photo
First, open Clipdrop.co in your browser and click on the “Tools > Relight” option. Then, upload the image you want to edit from your computer.
2. Adjust Relighting Effects
Once the photo gets uploaded, you’ll see various relighting options on the right panel. Clipdrop will automatically apply the “Receive Light” effect.
Here are some ways you can enhance the lighting:
- Try presets – Apply options like “Antique” or “Restore” first to see if you like the preset look
- Add colored lights – Click the “+” icon to add more lights and choose colors like red, yellow, blue etc.
- Reposition lights – Drag the circular icons on the image to highlight specific areas
- Modify intensity – Expand/shrink the circles or modify the “Dodge” slider to increase/decrease brightness
Tip: Add contrasting colored lights to create visually appealing effects.
3. Review and Download the Photo
Once you finish relighting adjustments, review the final image thoroughly before downloading. Click the eye icon to compare with the original photo.
If you need to make more edits, you can go back and tweak the lighting effects further. Finally, click the “Download” button once satisfied to save the relit image to your device.
The enhanced photo will download in the original resolution so you can freely use it across websites, social media, or print materials.
Tips for Using Clipdrop’s Relight Effectively
Here are some handy tips to use the relight function skillfully:
Do:
- Add warm light (yellow/red) for a cozy look
- Use cool light (blue) to brighten up dull areas
- Keep intensity low for a subtle effect
- Highlight dark corners that need illumination
Don’t:
- Overdo the lighting effects
- Wash out colors by making everything too bright
- Create an artificial look with intense colored lighting
By applying relighting judiciously, you can give lifeless images a vibrant makeover!

12 Ai Generated Selfie Art: Transforming Your Selfies with AI
AI selfie generators offer a wide array of benefits, from instant enhancement to artistic expression and entertainment.
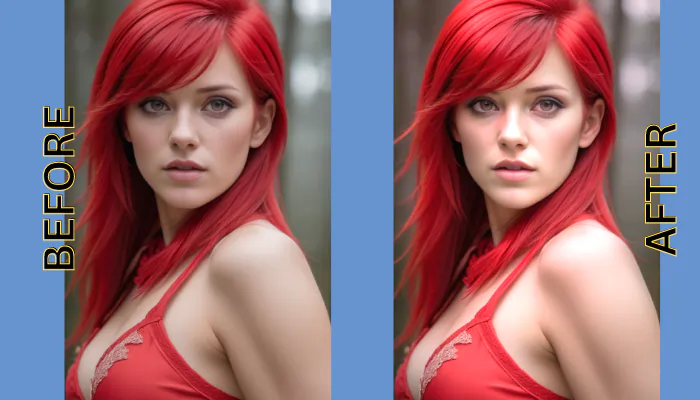
Relit Photo Examples
Here are a couple of before-after examples where Clipdrop’s relight feature dramatically improved the ambiance:
Outdoor portrait: Added yellow light + increased exposure for the face
Indoor still-life: Blue light used to illuminate the left + overall brightness improved
As you can see, subtle yet effective relighting adjustments can greatly liven up dull photos.
FAQs about Clipdrop’s Relight
Here are answers to some commonly asked questions about the relight capability:
Is the relight feature completely free to use?
Yes, basic relighting functions don’t require any payment or subscription. There are advanced tools for colored glints, textures etc in the paid plans.
What file formats does it support?
You can upload JPG, PNG or BMP files. The edited photos can be downloaded as JPG or PNG files.
Can I relight videos files?
No, currently Clipdrop’s online editor only supports static photo images.
Is there an option to save my adjustments?
Unfortunately, saving custom relight presets is not possible currently. You have to manually readjust lighting for each new image.
Free Way to Removing Persons and Objects in Images
Magic Studio is a game-changer in the world of image editing. With its AI-powered tools, anyone can effortlessly edit and create stunning
Conclusion
I hope this post gives you a good understanding of how Clipdrop’s relight tool works and how you can use it effectively. With Clipdrop you can transform dull, lifeless images easily by adjusting colored virtual lighting. Just drag the lights around, modify intensity and position as needed until you get the desired ambiance in your photo.
So leave the dark, underexposed shots behind! Go try the relight magic on Clipdrop, and do share your dazzling before-after photos with us!
Last modified: October 9, 2025

